


← Drilling Layouts Hub / Brunswick
BRUNSWICK OFFICIAL GUIDE
Brunswick Drilling Layouts
Brunswick’s official drilling instructions for symmetric and asymmetric balls. Seven layouts for each core type, covering everything from heavy oil hook to broken-down length, plus dedicated full-roller variations.
By the BowlersMart Pro Shop Team. Sourced from Brunswick’s official drilling instruction PDFs. Last reviewed for the 2026 season.
IN THIS GUIDE
- Brunswick legend (P, L markers)
- 7 asymmetric layouts
- 7 symmetric layouts
- Full roller variations
- Warranty rules
- Official PDF downloads
How to Read a Brunswick Layout
Brunswick uses two markers on every ball and one important measurement. Get these three things straight and every layout chart on this page makes sense.
P = Pin
The larger marker on the ball. Indicates the top of the weight block (core). Position relative to the fingers defines pin up versus pin down.
L = PSA / Mass Bias
The smaller marker. Shows the ball’s Preferential Spin Axis. Found only on asymmetric balls. Position relative to your PAP defines backend shape.
Pin-Out Distance
The factory measurement between Pin and CG, printed on the box. Each Brunswick layout below specifies the pin-out range it is designed for (0″–3½”, 3″–6″, and so on).
For left-handed bowlers: use the mirror images of every layout shown below. Brunswick publishes all charts from the right-handed perspective.
ASYMMETRIC CORE
7 Asymmetric Layouts
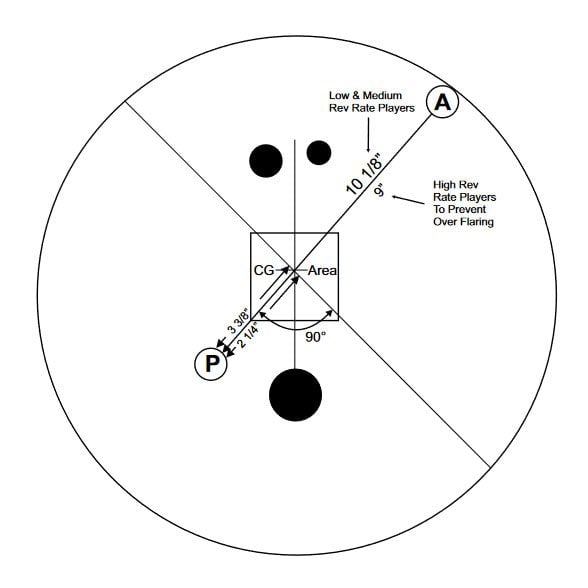
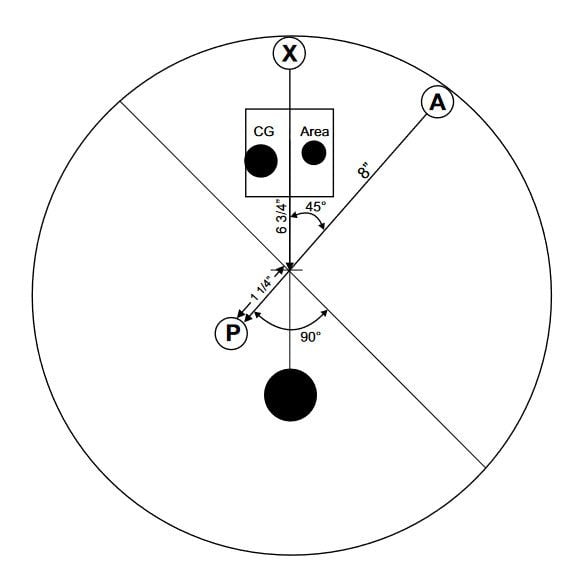
Asymmetric balls carry a mass bias marker (L) in addition to the pin (P). Brunswick’s seven asymmetric layouts cover heavy oil, fresh sport patterns, broken-down house shots, and the full-roller release.


SYMMETRIC CORE
7 Symmetric Layouts
Symmetric Brunswick balls use only the pin (P) reference. Drilled correctly, they produce predictable, smooth motion at every length and lane condition.


⚠️
Brunswick Warranty Requirement
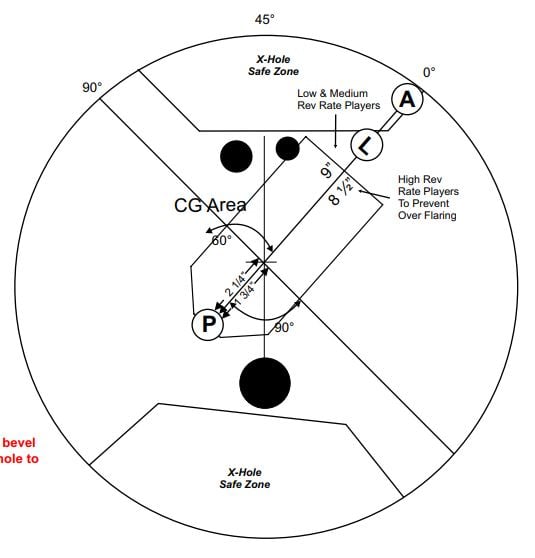
For every Brunswick layout shown above: finger, thumb, and X-holes must have at least a moderate bevel, and the riser Pin (P) must be at least one inch away from any drilled hole. Violating this voids the Brunswick warranty. Any certified pro shop will confirm these tolerances at fitting.
Brunswick Drilling FAQ
Common questions about applying these layouts to your Brunswick ball.
How do I know if my Brunswick ball is symmetric or asymmetric?
Asymmetric balls have an additional small marker (the L or PSA pin) printed alongside the larger main pin (P). If your ball only has one pin, it is symmetric. Brunswick prints both markers clearly on their asymmetric models. Use the asymmetric layout charts above if you see two markers, symmetric if you see one.
What does pin-out distance mean and where do I find it?
Pin-out is the factory measurement between the pin (P) and the center of gravity (CG), in inches. It is printed on the box label and often etched on the ball itself near the pin. Each layout above specifies the pin-out range it is designed for (for example “0–3½ inches”). Pick a layout whose range includes your ball’s pin-out measurement.
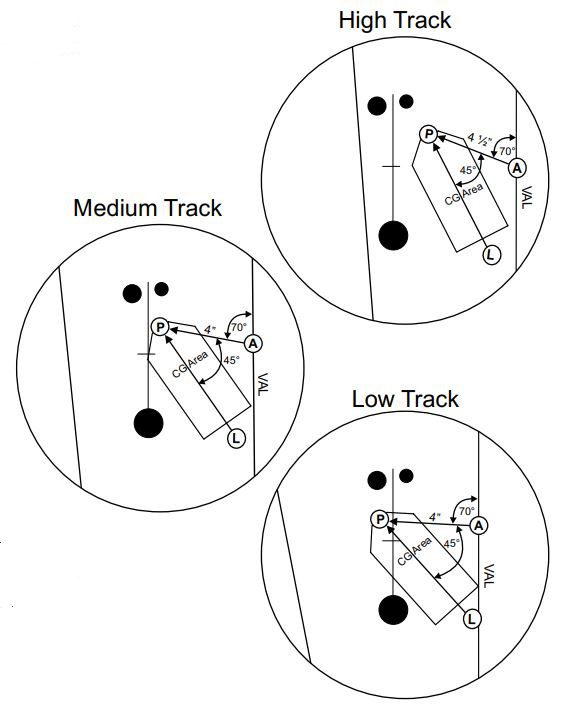
What is the difference between locator angle and VAL angle?
Both are angles measured from your PAP, but they reference different things. The locator angle (45°, 60°, 70°) describes where the pin sits relative to your PAP and helps orient the core. The VAL angle (Vertical Axis Line) describes the angle between your PAP and the line drawn from PAP through the pin to the VAL, which controls backend shape. Brunswick’s instructions use both because they describe different aspects of the layout.
Can I use these Brunswick layouts on other brands?
The principles transfer, but the specific numbers do not. Every manufacturer designs their cores with slightly different RG, differential, and intermediate differential values, and they publish layouts tuned to those cores. A layout that works perfectly on a Brunswick Quantum will look different on a Storm Phaze or a Hammer Spawn. Use brand-specific guides whenever possible.
What is the full-roller release and why does it have its own layouts?
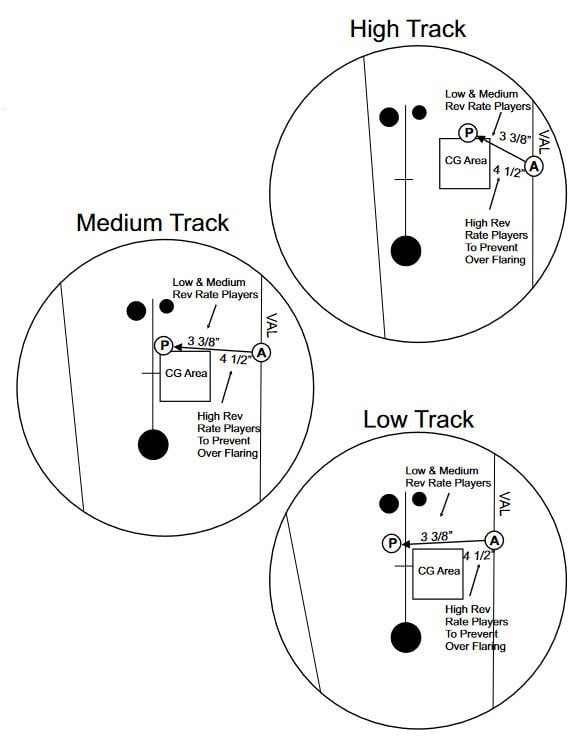
Full-roller is a release style where the ball rolls over the entire circumference of the track, rather than the more common semi-roller or spinner tracks. Full-rollers create a larger flare ring on the ball, which means traditional pin distances over-flare and lose energy. Brunswick publishes dedicated full-roller layouts (in red headers above) with adjusted pin distances to keep flare manageable for the style.
What if my measured PAP differs from the one in the chart?
It will. The charts are drawn from a standard reference PAP for illustration. Your actual PAP is unique to your release and is measured at the pro shop. The chart shows the relative geometry, not the absolute coordinates. A certified driller will apply the chart’s geometry to your specific PAP measurements when laying out the ball.
More From the Drilling Hub
HUB
All Drilling Layouts
The complete reference: Dual Angle, VLS, 2LS, the 8 most common layouts, and brand guides.
ANOTHER BRAND
Storm Drilling Layouts
Storm’s symmetric, asymmetric, and Pin Buffer system instructions.
ANOTHER BRAND
Motiv Drilling Layouts
Motiv’s recommended layouts across their performance ball lineup.
NEXT STEP
Have a Brunswick layout in mind? Take it to a pro shop.
These charts give a certified driller the starting geometry. Your measured PAP, span, pitches, and rev rate decide the final numbers. Find a BowlersMart pro shop near you to book a fitting.