


Bowling How To's & Coaching Tips, Bowling News, Bowling Tips & Coaching Articles, Storm Bowling Ball Videos, Surface & Layouts
Storm | Pin Buffer Layout System For Bowling Ball Drilling – Part 1: PIN-to-PAP Distance
Part 1 of 3: The effect of the PIN-to-PAP distance on ball motion in Storm's Pin Buffer Layout System.


DECISIONS DECISIONS
There are many decisions that need to be made after purchasing your newest bowling ball. All of them are pieces of a puzzle that fit together properly to create good ball motion. The Pin-to-PAP distance is going to be the first and one of the most important decisions that should be made regarding the layout. Of the changes you can make to a layout, Pin-to-PAP distance is going to have the greatest effect. If you are starting to build a new arsenal, it is best to take a look at some of your current equipment to see what types of Pin-to-PAP distances you have been utilizing. You may notice you prefer certain distances over others. You might find that all of your equipment utilizes a similar distance. Does that distance match up well to your ball speed/rev rate or the conditions you are bowling on?
Pin-to-PAP distance might happen to be the piece of the puzzle that was missing for you.
After reading this article, you may begin to understand why you struggle on certain conditions. The goal of this article is to open your eyes to experimenting with different Pin-to-PAP distances to create different shapes. Let’s take a look at some background information on what the Pin-to-PAP distance is and how it affects ball reaction.
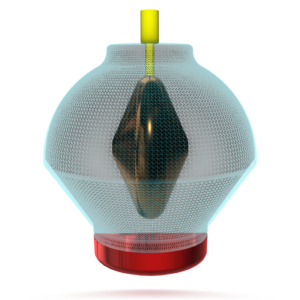
ORIENTATION OF THE CORE
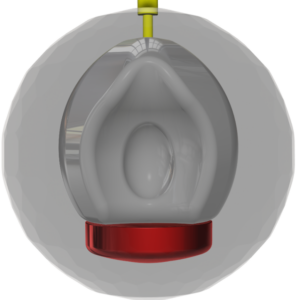
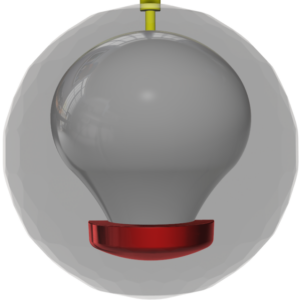
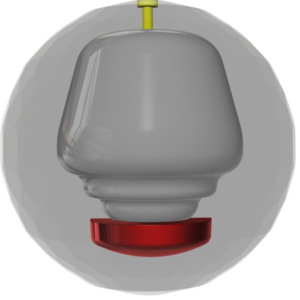
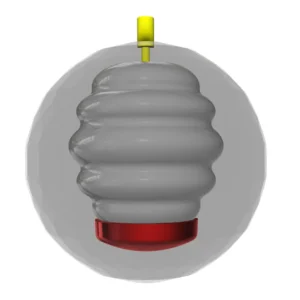
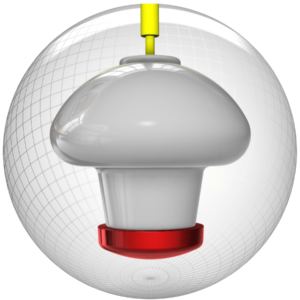
The Pin-to-PAP distance (appropriately enough) is the distance from your positive axis point to the pin. It is going to control how much of the core’s flare potential you utilize in the bowling ball. It is controlling how the core is oriented at the moment of release. The Pin-to-PAP distance can range anywhere from 0 to 6 ¾”. You might notice that this is approximately 1/4 of the bowling ball. We have turned the coverstock and core translucent in the above figures to show you the orientation of the weight block with different Pin-to-PAP distances. It’s important to note that these do not take into consideration axis rotation or axis tilt. They are simply rolling forward with 0 degrees of both axis rotation and axis tilt. Figure 1.1 shows the position of the core at release with a 0″ Pin-to-PAP distance. We’ve put a green dot on the weight block to aid in visualizing the rotation since there is minimal movement. This illustrates how stable the weight block is upon release and why it doesn’t create a significant amount of track flare. It is rotating around the lowest RG axis. Skip over to Figure 1.3. Once again the weight block is in an extremely stable position. It is standing completely up rotating around the highest RG axis. Figure 1.2 illustrates the rotation of the weight block exactly halfway between these two points at 3 ⅜”. The weight block will be in the most unstable position because it is sitting at a 45-degree angle inside the ball at the release point. This is going to result in the highest amount of track flare that particular core can produce. Different cores are going to produce different amounts of flare depending on the amount of total differential in the shape of the weight block inside of the core. Simple shapes can produce as little as 1″ of flare. More complex shapes can produce upwards of 6″ of total flare on the bowling ball. Now that we know the flare potential of the bowling ball can be manipulated using different Pin-to-PAP distances, we need to see what happens on both sides of the RG curve to understand why a ball can flare the exact same amount, but give us two completely different shapes down the lane.
STRONG PIN-TO-PAP
Figure 2 shows the general position of the core with a strong Pin-to-PAP distance. You can see that a Pin-to-PAP distance of 3 ⅜” utilizes 100% of the core’s flare potential because it is sitting in the most unstable position at the point of release. This is going to cause the core to wobble more than any other position which produces the most track flare. Stronger Pin-to-PAP distances are going to give you a strong predictable motion that you can count on in the midlane. This can be good in many different situations. One that comes to my mind is when the lanes are transitioning and you need something to blend out the pattern. Depending on the lane surface and volume of the oil pattern, you can even get away with these stronger Pin-to-PAP distances on some shorter patterns because it revs up strong in the midlane and blends out the end of the pattern. If we move up the curve, we increase the distance from 3 ⅜” towards 6 ¾” we utilize the higher RG side of the curve. As we get closer and closer to 6 ¾”, the flare potential in the bowling ball is lowered because we are putting the core in a more stable position. This results in the ball hooking less and later down the lane. This happens because we are standing the core up in a more stable position about the higher RG axis. The higher the RG, the more resistant the ball will be to changing direction as it travels down the lane. Using longer Pin-to-PAP distances is going to raise the RG and promote a slower transition with a cleaner shape through the front part of the lane. You will see more change in direction down lane with longer Pin-to-PAP distances.
LONG PIN-TO-PAP
Figure 3 shows the general position of the core with longer Pin-to-PAP distances. In general, longer Pin-to-PAP distances are good to use on the burn when you need the extra tumble through the front part of the lane. The ball is going to want to conserve energy much longer and transition slower. As soon as the bowler releases the ball, the energy the bowler imparts on the ball will begin to be lost. Controlling how quickly the energy is lost is crucial to creating good ball motion. There are more variables than just the Pin-to-PAP distance that influence the rate that energy is lost, but for this article’s purpose we are simply looking at this one piece of the puzzle. Using too strong of a Pin-to-PAP distance when the pattern is extremely dry will result in the ball losing too much energy too early on the lane. It is going to be very difficult for the ball to get through the pins properly when it has used up a majority of its energy in the front part of the lane. We only have 15lbs of ball to knock down 34lbs of pins. We need the ball to be in the proper phase of ball motion at the correct entry angle to win the battle. To accomplish this, you’ll want to make sure you are using longer Pin-to-PAP distances when the lanes are drier to promote a cleaner look through the front with more energy down lane. This will allow the ball still have enough energy to make it around the corner and get through the pins properly. Keep in mind there are always exceptions in our game, but this gives a good generalization to get your mind headed the right direction.
SHORT PIN-TO-PAP
Figure 4 shows the general position of the core with shorter Pin-to-PAP distances. The more we begin to decrease the distance from 3 ⅜” towards 0″ we utilize the lower RG side of the curve. As we get closer and closer to 0″, the flare potential in the bowling ball is lowered because we are putting the core in a more stable position. This will result in the ball hooking less and earlier on the lane. This happens because we are lying the core down in a more stable position about the lower RG axis. The lower the RG, the less resistant the ball will be to changing direction as it travels down the lane. Using shorter Pin-to-PAP distances is going to promote a faster and smoother transition through the front part of the lane. You will see a much earlier roll with not much direction change down the lane if you utilize shorter Pin-to-PAP distances.
In general, this would be good to use on either the fresh, or a very short pattern where you are looking for control off the end of the pattern. The ball is going to get into a roll extremely early because the core is laying in such a stable position around the lowest RG axis. This means that it will use a lot of its energy early and smooth out the reaction down lane. This can be great when the lanes are really flat and you are looking to stay out of trouble. You will get a smooth predictable reaction out of shorter Pin-to-PAP distances. Of course, it could be a bit of a challenge to get them to go through the pins properly because so much of the energy is used in the front part of the lane. Remember, we have a 15lb ball against 34lbs of pins.
Luckily modern day bowling balls cause lane patterns to transition extremely fast.
The bowler should be able to move from these shorter Pin-to-PAP layouts to other layouts that will give them more shape down lane. Shorter Pin-to-PAP distance layouts definitely aren’t what you want to have on every ball, but they can save you from the dreaded 150 game on the fresh or when the pattern is extremely difficult. That could be the difference between winning and losing. It’s not always the ball that you throw in the finals that got you the win. Sometimes the unsung hero is the ball that keeps you out of trouble when the lanes are tough. A good arsenal is always going to have at least one shorter Pin-to-PAP distance ball for control.
SYMMETRICAL VERSES ASYMMETRICAL
One final topic that must be addressed when discussing Pin-to-PAP distance is the different effects it has on a symmetrical ball verses an asymmetrical ball. Figure 5 shows the difference between a symmetrical shape and an asymmetrical shape. Since an asymmetrical ball has the presence of a preferred spin axis (PSA) there can be significant differences when using longer Pin-to-PAP distances. These differences depend on the location of the PSA. If the ball driller puts the PSA in a weak position, longer Pin-to-PAP distances will react similar to a symmetrical ball. If the PSA is placed in a strong position, the ball will actually flare more with longer Pin-to-PAP distances than they will on a symmetrical ball. This is just another example of how much more versatile some of those asymmetrical shapes are. They can be fine-tuned further than a symmetrical ball to get a closer match to what you are looking for.
WRAP-UP
Concluding this article, we can see that the Pin-to-PAP distance is a powerful tool in creating proper ball motion. It controls how much flare and what side of the RG curve we use. A problem many bowlers have when they run into issues with carry is their ball either still hooking or being completely rolled out at the pins. There is a small window in there where the ball is in a strong roll. A ball is always going to transfer more energy if it is rolling through the pins. We are bound by the laws of physics in our world. We have 34lbs of pins is standing in the way of a 15lb bowling ball. The pins are always going to win unless we get the ball into the roll phase at the correct time and at the proper entry angle. Pin-to-PAP distance is going to help you control how much energy your ball has and where it begins to use it so you can begin to create the proper shape and entry angle. Always be sure to have a few different Pin-to-PAP distances in your arsenal to be sure that you can create the right amount of flare for anything you are bowling on. As previously stated, there are many more variables that influence ball motion. This article looked solely at Pin-to-PAP distance and held other variables constant. This is just one piece of the puzzle to creating good ball motion. Future articles will cover other pieces of the puzzle to help you understand the entire picture.
more bowling articles you may enjoy

Redemption in Allen Park: EJ Tackett Wins a Historic Fourth Straight PBA World Championship
By Brian Halstrom, BowlersMart Editorial Team | Published June 2026 Two months ago, on the [...]
Jun

Motiv Sigma Tour Pearl Bowling Ball Review: Sigma Core + Atomic Propulsion Pearl Coverstock
By Brian Halstrom, BowlersMart Editorial Team. Specs on this page are verified against Motiv’s official [...]
Jun

Roto Grip and 900 Global Drop 4 New Bowling Balls for June 2026
By Brian Halstrom, BowlersMart Editorial Team | Published June 2026 Roto Grip and 900 Global, [...]
1 Comment
Jun

900 Global Vengeance Returns Bowling Ball Review: Blast AI Core + RB 91 Hybrid Coverstock
By Brian Halstrom, BowlersMart Editorial Team. Specs on this page are verified against 900 Global’s [...]
Jun

900 Global Viking Conquest Bowling Ball Review: Strobe AI Core + RB 94 Solid Coverstock
By Brian Halstrom, BowlersMart Editorial Team. Specs on this page are verified against 900 Global’s [...]
Jun

Roto Grip Hustle VP Bowling Ball Review: Hustle Core + VTC Pearl Coverstock
By Brian Halstrom, BowlersMart Editorial Team. Specs on this page are verified against Roto Grip’s [...]
Jun
Roto Grip Hustle SOS Bowling Ball Review: Hustle Core + VTC Hybrid Coverstock
By Brian Halstrom, BowlersMart Editorial Team. Specs on this page are verified against Roto Grip’s [...]
Jun

Motiv Covert VIP EXJ Bowling Ball Review: EJ Tackett’s Limited-Edition Vanquish-Core Weapon
By Brian Halstrom, BowlersMart Editorial Team. Specs verified against Motiv’s official Covert VIP EXJ release [...]
Jun
VERY GOOD – EASY TO UNDERSTAND
Enjoyed reading how the different set ups for ball motion create how a ball reacts thrown consistently by expierenced bowlers. As a life time 200+ bowler I have never looked at what these ball set ups would do to enhance my game if I paid more attention to what I wanted a ball to do. Thanks for that.
I like the Storm Pin Buffer layout when I drill balls for customers, is their an advantage if you use the dual angle approach.
How do you drill the ball without me there
We recommend visiting one of our BowlersMart pro shops to get the ball professionally drilled. Our locations can be found here – https://www.bowlersmart.com/locations/
I really enjoyed your video on Pin to pap. So where do your fingers a thumb positions go.
Could not see layouts in artical / no pictures. Would have understood information better.
Do you charge to find my PAP on a
bowling ball before you drill a bowling ball.